


3V@~QDUHVCO2A)U6Q")
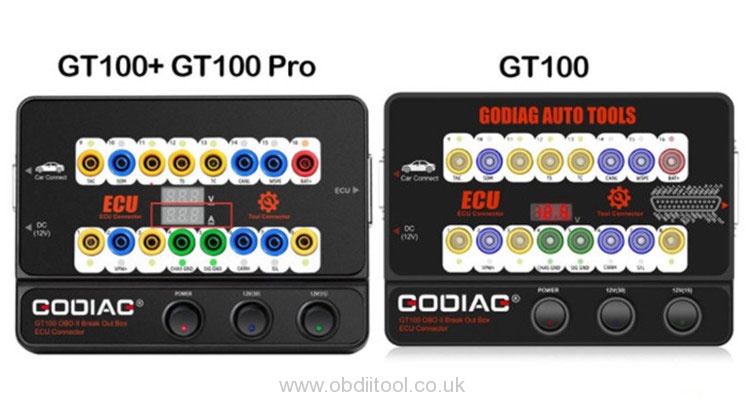
The newly launched original GODIAG Auto Tool- GODIAG GT100+ GT100 Pro has more functions than GODIAG GT100 Break Out Box. It not only adds electronic current display and CANBUS Protocol communication but also can program key for VW, Porsche, Mitsubishi, etc with all keys lost- activate the instrument or immobilizer module. Moreover, it is available with European, American and British regulations.
What can GODIAG GT100+ do (incl. new functions)?
It is a new ECU connector and protocol communication testing equipment. It’s convenient for users to individually connect the ECU module to diagnose, program and code. It may also be used for testing whether the diagnostic / programming /coding tool can send communication signals. See the detailed functions as below:
- OBDII protocol detector and protocol communication diagnosis
- All keys lost key programming and forced start of instrument connection
- Voltage / Current Value Display
- OBDII Display custom CAN protocol communication
- ECU connection
- Expanded connection
- OBD1 diagnostic interface converted to standard OBD2
- Multi-ECU connection mode
- Extension cable Function
- Power the car when replacing the battery
- Optional dedicated Adapter
- Work with CAS4/CAS4 + programming test platform
- Work with FEM/BDC programming test platform
What’s the advantage of new function? How to use?
1.Electronic current display
On bench connect the ECU module by using the banana connector or db25 dedicated ECU interface, and Godiag GT100+ will display the current value.
The user can intuitively see the current status of the ECU. There is no current display or the actual displayed current is inconsistent with the engineer’s expected current, then you can immediately check whether the wiring is wrong, if the wiring is correct, he can judge that the ECU may be broken, so there is no need to perform diagnostic communication and can directly repair the ECU.
If it shows too much current, then you can also determine if the cable is wrongly connected or the ECU is broken.
2.CANBUS Protocol communication
GODIAG GT100+ supports more protocols like CANBUS, K-Line, PWM, VPW+ and KWP2000 so far.
CANBUS Protocol communication:
GT100+ Pin 1, 9, 3, 11 12, 13, 8 [corresponding to the yellow banana connector on the machine], these non-standard obd2 protocol interface may display CAN BUS or K-Line communication protocol. GT100 can only display K-Line Pwm Vpw+ KWP 2000 protocol. GT100+ will display CANBUS K-Line Pwm Vpw+ KWP 2000 protocol communication.
3.Program key for VW, Porsche, Mitsubishi etc with all keys lost – activate the instrument or immobilizer module.
1.For VW all keys lost
To program VW 4th generation / 5th generation all keys lost (e.g. new A6L Touareg A4 Q5 A7), please operate as below.
Step 1: Use GT100+ to short-circuit banana connector PIN 16—-PIN 1 to lit up the dashboard
Step 2: Use the key programmer tool to connect with the female adapter of GT100+ for data collection.
Note: Some vehicle dashboards won’t be lit up, but data can also be collected, such as A6L Q7.
2.For Toyota all keys lost
To replace the engine ECU of Toyota or to use some key programmer to program Toyota when all keys lost, it needs to short-circuit PIN13-PIN4
3.For Mitsubishi all keys lost
To program Mitsubishi key with all keys lost or to set OBDII when all remote key lost, please short-circuit PIN1-PIN4.
4.For Porsche Cayenne key
To program Porsche Cayenne key with all keys lost or with all remote key lost, please short circuit PIN3-PIN7.

How to use other functions GODIAG GT100+ supported?
1).Used to check whether the diagnostic / programming / coding tool can send communication signals.
How to use:
- Connect the diagnostic / programming / coding tool to the OBD2 port of GT100+. (Do not connect it to the vehicle)
- Select the vehicle model and functions to operate.
- If the device can send the communication signals, the corresponding protocol indicators on the GT100+ will be ON or blink. If the device can’t send the communication signals, there will be no indicator light on, it means the device has a connection problem or is damaged.
2.) Test the communication status between the code reader and the vehicle protocol
How to use:
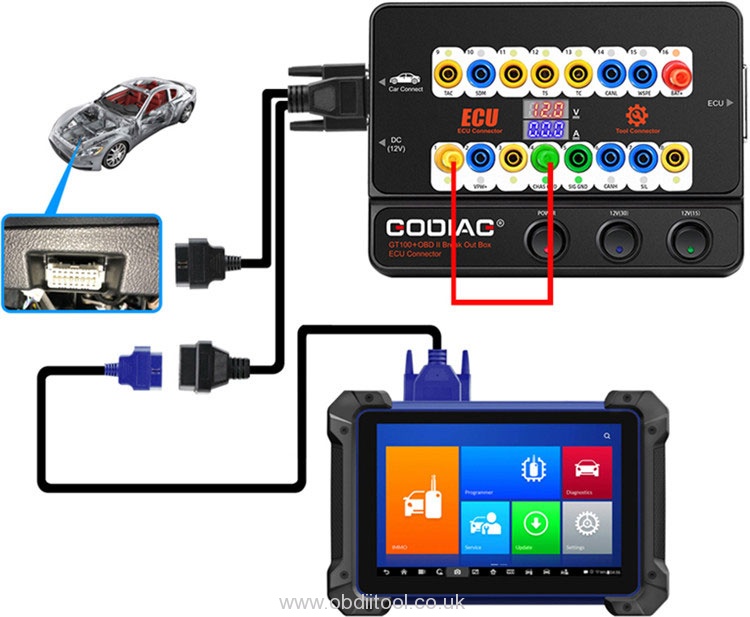
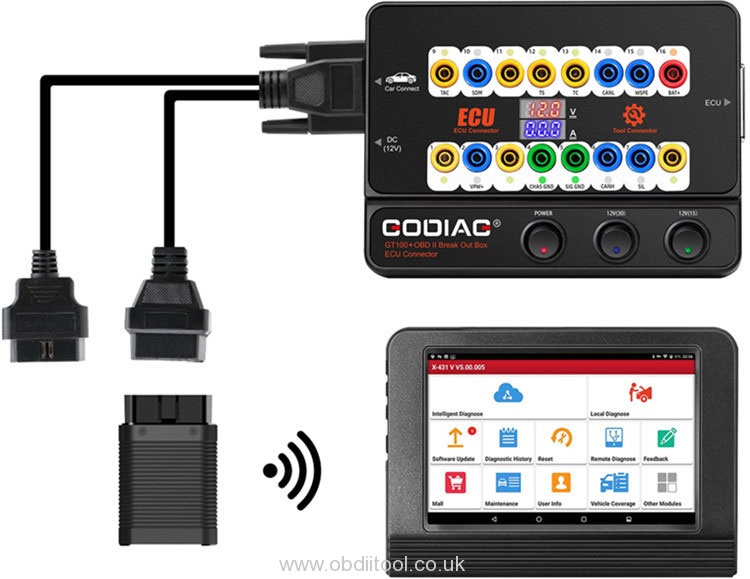
- GT100+ is connected to the vehicle OBD2 port.
- Start the Power switch, and GT100+ will display the current accumulator voltage. (If no voltage is displayed, please check the vehicle diagnostic interface and the cable. If the voltage is lower than 10V, please do not start the vehicle or go ahead for function operation, please charge the car with a car charger.)
- Connect the diagnostics / programming / coding tool well. When it communicates with the vehicle, the corresponding protocol indicators on the GT100+ equipment will be lit up or blink. It’s convenient for users to observe which protocol is under use by the vehicle module and the status of the communication.
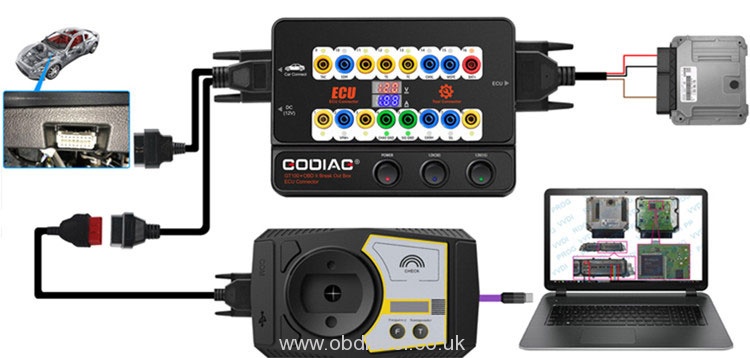
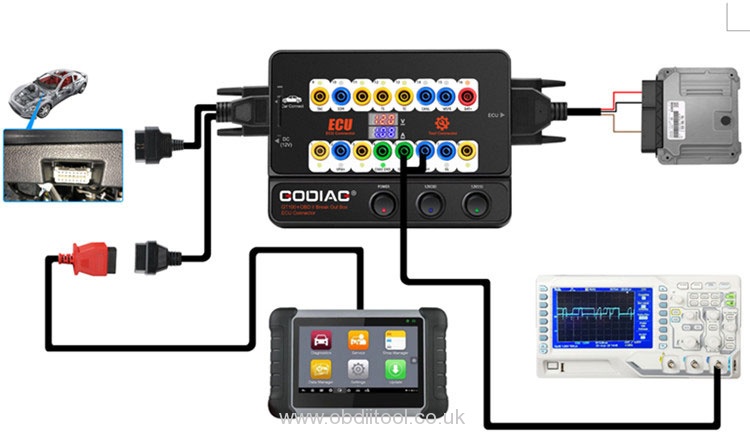
3).Quickly communicates with a single ECU on bench by connecting with the ECU diagnostic / programming tool. [Which allow the engineers or technicians to complete the job on bench, also keep away the risk of data loss in other modules when directly testing on the vehicle.]
How to use:
- Connect GT100+ and the dedicated ECU color jumper.
- Connect the ECU which needs to diagnose or program by following the definition of ECU connecting.
- Connect the 12V DC power adapter.
- Start the Power switch, and GT100+ will display the current working voltage of the power adapter.
- By connecting well the diagnostic / programming / coding tool, GT100+ protocol indicator will turn on or blink to indicate which protocol of the car module and the communication status.
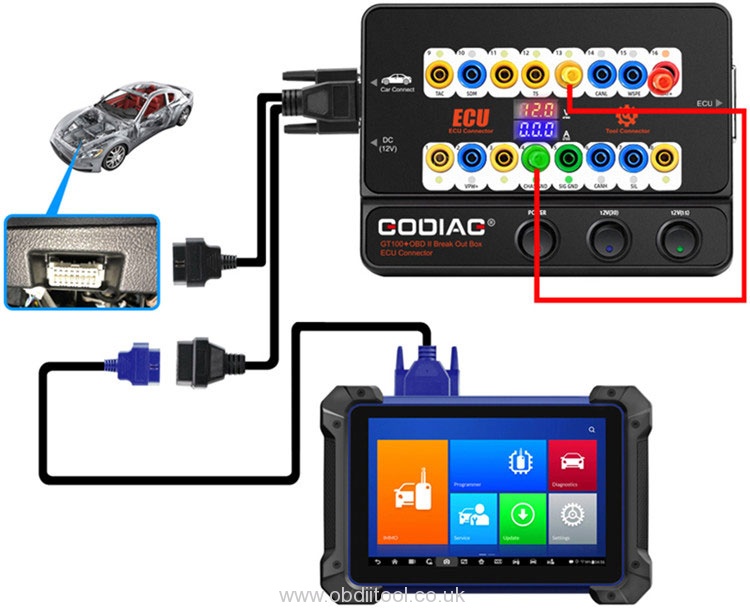
4).Multiple vehicle ECU module connecting. [It’s aimed at solving the problem of engineers and technicians who need to connect multiple ECU during programming a module, such as connecting to multiple ECU modules for key programming]
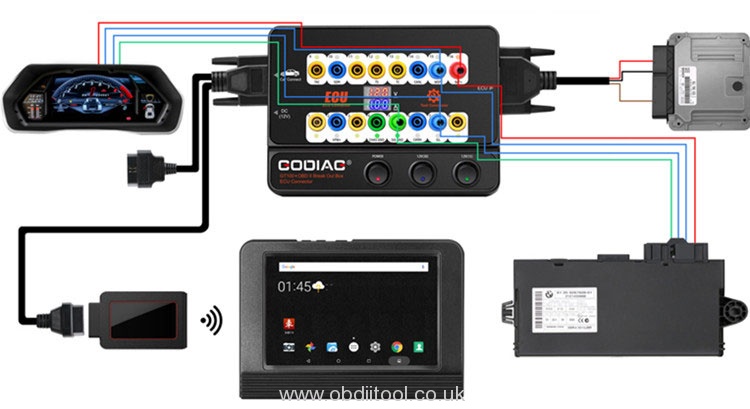
How to use:
- Connect GT100+ and Colorful Jumper Cable DB25. Insert the DB25 jumper into the banana plug, tighten the screw, and then insert it into the corresponding port of GT100+.
- Connect the ECU which needs to diagnose or program by following the definition of ECU connecting.
- Connect the 12V DC power adapter.
- Start the Power switch, and GT100+ will display the current working voltage of the power adapter.
- When there is a good communicating between the car and the diagnostic / programming / coding tool, GT100+ protocol indicator will turn on or blink to indicate which protocol of the car module and the communication status.
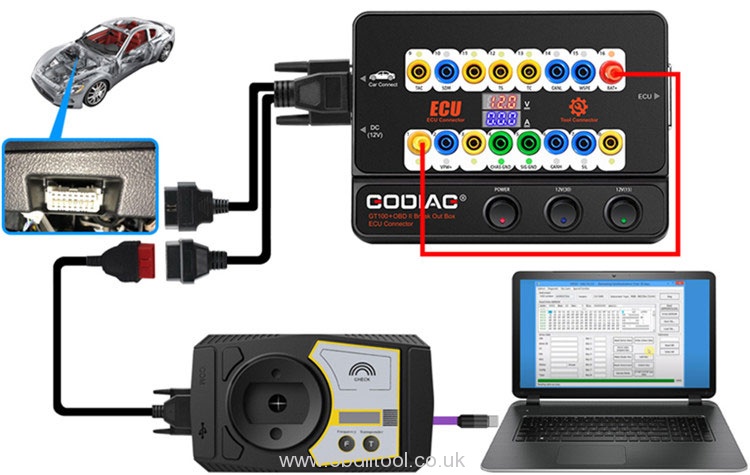
5).Replace the Auxiliary Power Supply for the Battery – uninterruptible power supply connecting mode. [Since there’s failure or missing antitheft remote control data of some vehicles when the battery is dismantled, the auxiliary power supply aims at supplying power to the vehicle through GT100+ before replacing the battery to sustain the power supply to the vehicle. It guarantees the vehicle ECU is power connected during replacement of the battery.]
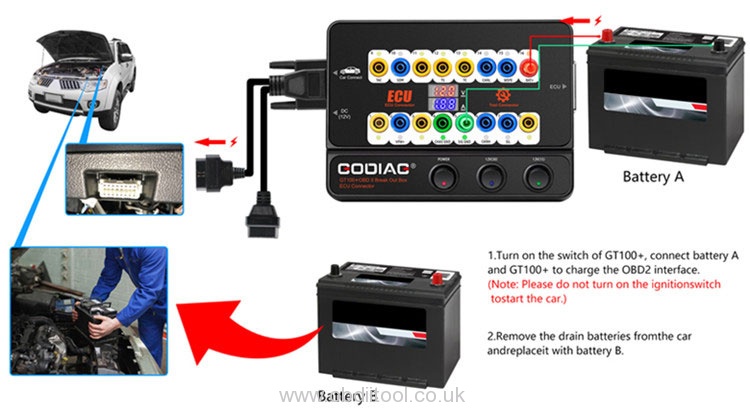
How to use:
- Prepare a spare battery “A” and a new battery “B” to be installed.
- Connect to NO.16 /4 /5 holes of Godiag GT100+ and the OBD2 diagnostic port of the car, and connect to the spare battery “A”.
- Switch on GT100+ Power.
- Connect GT100+ diagnostic cable to the OBD2 port of the vehicle. [Notes: do not turn on the ignition or start the vehicle.]
- Install the new battery “B”
6).The OBD2 cable of GT100+ is as long as 1.4 meters, which will solve the problem that the diagnostic tool cable is not long enough or the vehicle diagnostic port is too narrow to connect. Please connect GT100+ first, turn on the power switch and you will see the voltage on the screen which can tell whether the power supply of the vehicle is normal. [Which keep away the risk of burning out the diagnostic & programming tool due to the modified vehicle OBD2 port]
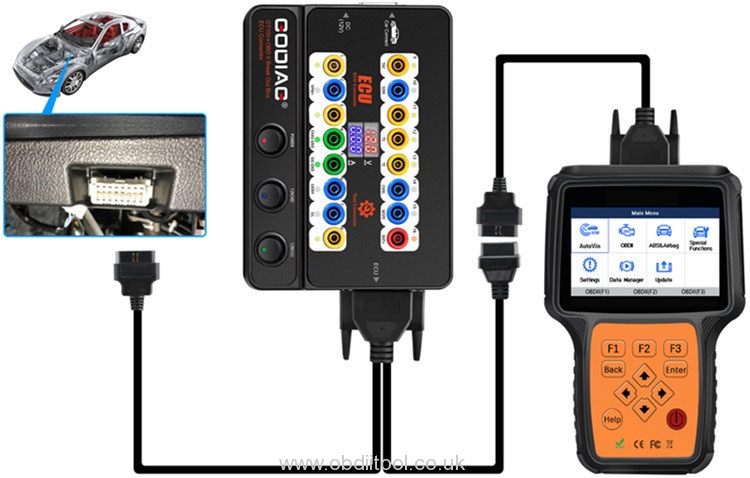
How to use:
- Connect GT100+ OBD2 to the OBD2 port of the vehicle.
- Switch on GT100+ Power. (If no voltage is displayed, please check the vehicle diagnostic port and the cable. If the voltage is lower than 10V, please do not start the vehicle or operate. Please charge the accumulator with a car charger first)
- The other OBD2 port of GT100+ is connected to the diagnostic tool.
- When there is a good communicating between the car and the diagnostic / programming / coding tool, GT100+ protocol indicator will turn on or blink to indicate which protocol of the car module and the communication status.
7).For old OBD1 vehicles or special diagnostic port, please connect GT100+ through the banana plug and DB25 jumper. The OBD1 diagnostic port or special diagnostic port can be transferred to the standard OBD2 diagnostic port.
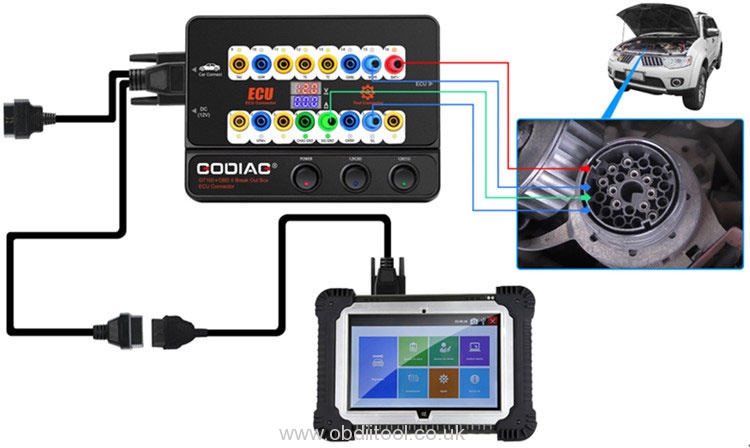
How to use:
- Insert the DB25 jumper into the banana plug, tighten the screw.
- Insert the banana plug into the corresponding port of GT100+ by following the OBD1 protocol.
- Connect the OBD2 port of GT100+ to the diagnostic tool.
- When there is a good communicating between the car and the diagnostic / programming / coding tool, GT100+ protocol indicator will turn on or blink to indicate which protocol of the car module and the communication status.
8).GT100+ will convert the OBD1 port of special truck to the standard OBD2 diagnostic port according to the protocol.
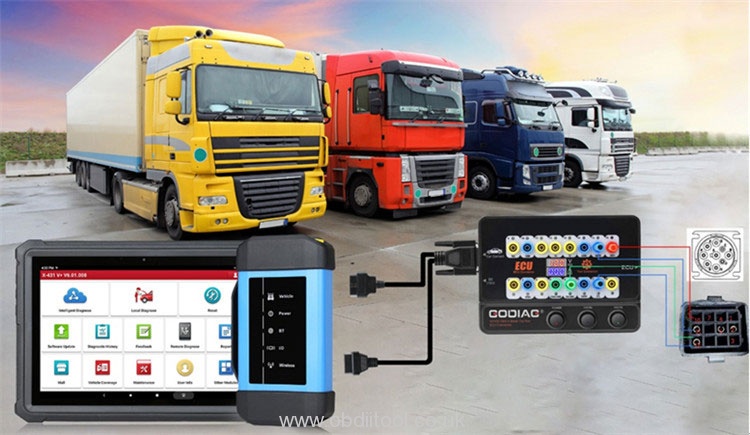
How to use:
- Insert the DB25 jumper into the banana plug, tighten the screw.
- Insert the banana plug into the corresponding port of GT100+ by following the truck OBD protocol.
- Connect the OBD2 port of GT100+ to the diagnostic tool.
When there is a good communicating between the car and the diagnostic / programming/coding tool, GT100+ protocol indicator will turn on or blink to indicate which protocol of the car module and the communication status.
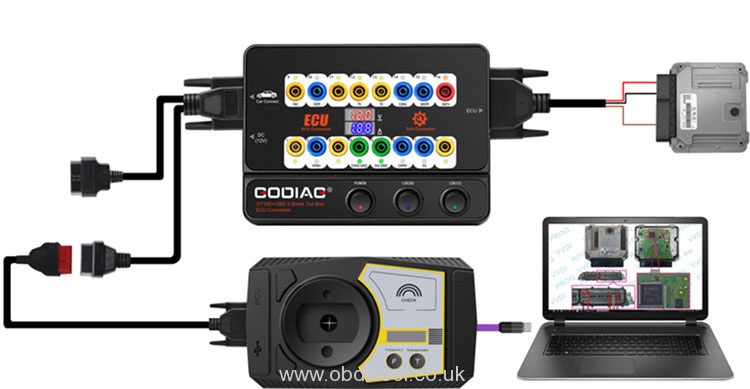
9).For BMW CAS4/CAS4+Programming Test Platform, it’s used to test whether the programmed key works with CAS4 normally.
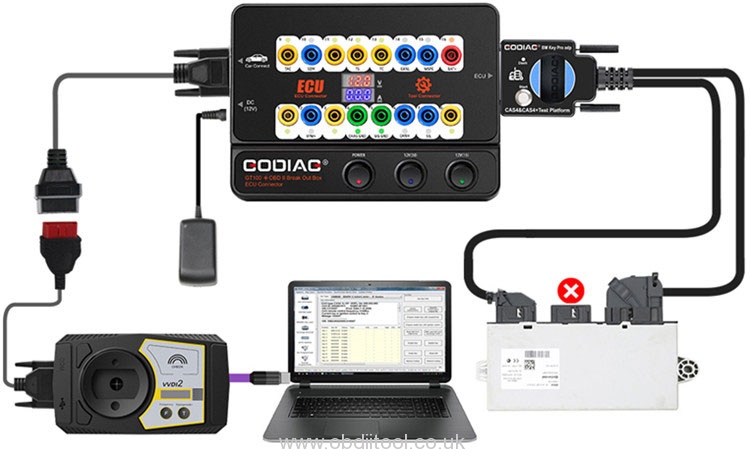
How to use:
- Connect the CAS dedicated plug to the CAS4 immobilizer module.
- Connect Godiag CAS4 / CAS4+ programming test platform to GT100+.
- Connect the OBD2 female cable of GT100+ to VVDI2 or the device which can read the data of CAS4.
- Open the key programmer software, and follow the instruction to obtain the data to complete key programming.
- If all keys lost, please keep pressing the start switch to forcibly start CAS4 so that the key programmer can read the data of CAS4.
- Put the programmed key into the key coil of Godiag CAS4 / CAS4+ programming test platform.
- Press the start switch of Godiag CAS4 / CAS4+ programming test platform, if the dashboard indicator turn on, it means that the key and the CAS4 module are synchronized, otherwise, they are not synchronized.
- Press the start switch again, and the dashboard indicator turn off.
- Press the start switch again, wait for about 10s and GT100+ CAN protocol indicator turn off.
10). For BMW FEM/BDC Programming Test Platform
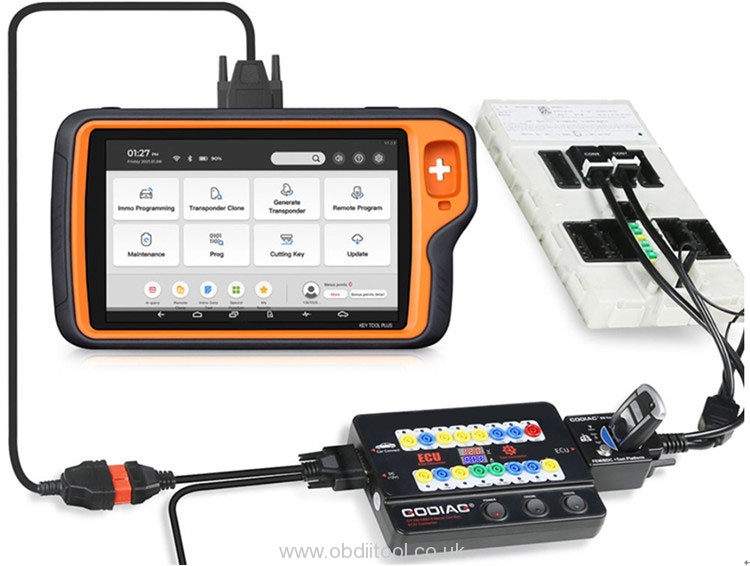
How to use:
- Connect FEM/BDC dedicated plug to FEM/BDC immobilizer module.
- Connect GT100+ or Godiag OBD2-DB25 cable to Godiag FEM/BDC programming test platform.
- Connect the OBD2 female cable of GT100+ to VVDI2/ VVDI KEY Tool plus or any other key programmer which can read data of FEM/BDC.
- Open the key programmer software, follow the instruction to obtain the data to complete key programming.
- Put the programmed key into the key coil of Godiag FEM/BDC programming test platform.
- Press the start switch of Godiag FEM/BDC programming test platform
If the dashboard indicator turns on, it means that the key and the FEM/BDC module are synchronized. Otherwise, they are not synchronized.
- Press the start switch for more than 3s, and the dashboard indicator turn off.
More connectors and dedicated modules are under development, please wait…
Due to GODIAG GT100+ adds more functions than GODIAG GT100, the price will be 20 USD more expensive. Both GODIAG auto tools are professional and cost-effective OBD2 Break Out Box ECU Connectors, just choose any one depending on the budget and the function you want to do.
All original Godiag tools are available here:
https://www.obdiitool.co.uk/wholesale/original-godiag-tools/